Creating async blueprint nodes in Unreal Engine
This post is part of a series of articles that I created during my time in university. It might be outdated at the time of reading but I will try my best to update it as frequently as possible.
Abstract
This article is about the creation of custom asynchronous blueprint nodes for Unreal Engine 5.3.2. These nodes will have one incoming execution pin and multiple outgoing execution pins that can be triggered after a certain amount of time or after a certain task is completed. This article expects that the reader is familiar with how to create C++ classes, dynamic multicast delegates and blueprints in Unreal Engine.
Introduction and problem
The post was written during a six month long project for a real client. The client tasked us (a team of 8 game dev students) to create a game that would promote the technology they developed. We created a multiplayer game that would use their technology as the controller.
The game that will be created would have different game modes: single player and multiplayer versus (1v1). For the multiplayer mode, code wass written in C++ to start hosting or to join an online game session. To make it easier for the designers to hook up the networking code to the menu system that they created, C++ functions where exposed to blueprints for them to use. To know the state of the operation (creating a game sesson or joining a game session), an extra function would be bound to an event of the network system of Unreal Engine. These functions would also be exposed to blueprints so the designer could run custom logic after a session has been created or when one was found.
Having two or more nodes per operation would clutter the blueprints and make it less maintainable. So, moving more funtionality in one blueprint node on the C++ side would make things more maintainable and easier for the designers to use. That is where asynchonous blueprint nodes come in. These nodes allow you to have multiple output pins that can be triggered from any moment in the run time of the game. Thus, the previously mentioned exposed blueprint nodes can be moved into the same node so we can bind one of the blueprint pins to each event that we want to listen to.
Implementation
Normally when creating blueprint nodes, you will use the UFUNCTION(BlueprintCallable) or UFUNCTION(BlueprintImplementable) macro above the chosen function that you want to expose to a specific actor or globally throughout all the blueprints. To create asynchronous blueprint nodes however, we will need to create a class inheriting from UBlueprintAsyncActionBase. This class will contain all the logic for our custom node.
Creating the class
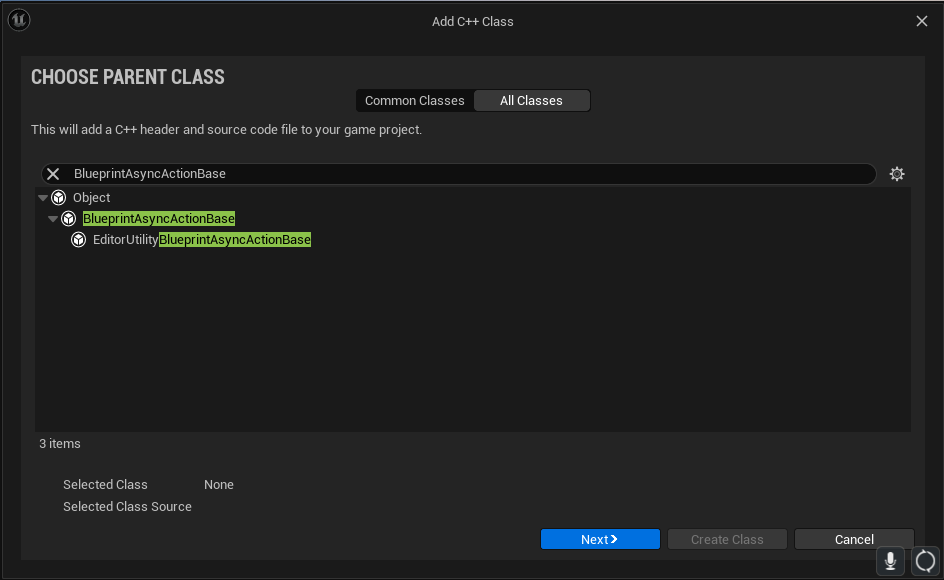
To create the class, open up the C++ class creation dialogue through Tools -> New C++ class.... Then in that dialogue select All Classes and search for UBlueprintAsyncActionBase. 
Click next and fill in the name of the class. For this demo it will be called UDemoAsyncNode. Unreal Engine will create UDemoAsyncNode.h and UDemoAsyncNode.cpp which will look like this:
For some reason, Unreal Engine created for me the following classes. You will see that they are not inheriting from the class that we selected. We will fix it in a moment.
1
2
3
4
5
6
7
8
9
10
11
12
13
14
15
// Fill out your copyright notice in the Description page of Project Settings.

#pragma once

#include "CoreMinimal.h"

/**
 *
 */
class ASYNCNODESUE_API UDemoAsyncNode
{
public:
	UDemoAsyncNode();
	~UDemoAsyncNode();
};
1
2
3
4
5
6
7
8
9
10
11
12
// Fill out your copyright notice in the Description page of Project Settings.


#include "UDemoAsyncNode.h"

UDemoAsyncNode::UDemoAsyncNode()
{
}

UDemoAsyncNode::~UDemoAsyncNode()
{
}
This is what Unreal Engine should have generated.
1
2
3
4
5
6
7
8
9
10
11
12
13
// Fill out your copyright notice in the Description page of Project Settings.

#pragma once

#include "CoreMinimal.h"
#include "Kismet/BlueprintAsyncActionBase.h"
#include "UDemoAsyncNode.generated.h"

UCLASS()
class ASYNCNODESUE_API UDemoAsyncNode : public UBlueprintAsyncActionBase
{
	GENERATED_BODY()
};
1
2
3
4
5
// Fill out your copyright notice in the Description page of Project Settings.


#include "UDemoAsyncNode.h"
// Just an empty cpp file.
Creating the pins
For the output pins of the node, we will use a dynamic multicast delegate to trigger the pins. You can use two types of delegates for the pins: one with parameters and one without. For this demo we will create the following delegate with one parameter above the class in the UDemoAsyncNode.h file so we can also send extra information with the pin output.
1
DECLARE_DYNAMIC_MULTICAST_DELEGATE_OneParam(FDemoOutputPin, int32, DemoOutput);
To create the pins, we will have to create public variables in the class that we just created per pin that we want to have. We will be using UPROPERTY(BlueprintAssignable) to tell Unreal Engine that we want to have these as the output pins on the node.
1
2
3
4
5
6
public:
	UPROPERTY(BlueprintAssignable)
	FDemoOutputPin Direct;

	UPROPERTY(BlueprintAssignable)
	FDemoOutputPin Later;
The header file now looks like this:
1
2
3
4
5
6
7
8
9
10
11
12
13
14
15
16
17
18
19
20
21
22
// Fill out your copyright notice in the Description page of Project Settings.

#pragma once

#include "CoreMinimal.h"
#include "Kismet/BlueprintAsyncActionBase.h"
#include "UDemoAsyncNode.generated.h"

DECLARE_DYNAMIC_MULTICAST_DELEGATE_OneParam(FDemoOutputPin, int32, DemoOutput);

UCLASS()
class ASYNCNODESUE_API UDemoAsyncNode : public UBlueprintAsyncActionBase
{
	GENERATED_BODY()

public:
	UPROPERTY(BlueprintAssignable)
	FDemoOutputPin Direct;

	UPROPERTY(BlueprintAssignable)
	FDemoOutputPin Later;
};
Creating the logic
For the blueprint node to work we need to create two new functions. The first function that we are going to declare is the actual node function. We will use the following macro and public function declaration:
1
2
3
public:
    UFUNCTION(BlueprintCallable, meta = (BlueprintInternalUseOnly = "true", WorldContext = "WorldObject"), Category = "Demo")
    static UDemoAsyncNode* DemoBlueprintNode(const UObject* WorldObject);
The DemoBlueprintNode function is the function that will setup the blueprint node. We will not put any main logic in here that we want to execute every time the node gets executed, we will use the Activate function for this that is described later.
BlueprintInternalUseOnly is there to notify Unreal Engine that it is an internal function that is used to implement a node or another function. This is never directly exposed to a blueprint graph. WorldContext sets the parameter to pass in a world object context to the function. This is not necessary to do but for this tutorial we will use it since we want to have a delayed call.
Next we will declare the actual function that gets called by Unreal Engine when calling the blueprint node in the graph. This will house the logic for the node.
1
2
public:
    virtual void Activate() override;
Next, we will declare the functions to trigger the pins:
1
2
3
4
5
6
private:
	UFUNCTION()
	void InternalDirectCall();

	UFUNCTION()
	void InternalLaterCall(float timeElapsed);
As the function name already suggests, these functions are just for internal use only thus also private. These will call the broadcast function on the pin variables so the pins get executed.
As a side thing do properly demonstrate the use of this node, some variables are added in order to delay the call to InternalLaterCall. The whole file will look like this with the last addition of those variables:
1
2
3
4
5
6
7
8
9
10
11
12
13
14
15
16
17
18
19
20
21
22
23
24
25
26
27
28
29
30
31
32
33
34
35
36
37
38
39
40
41
42
43
// Fill out your copyright notice in the Description page of Project Settings.

#pragma once

#include "CoreMinimal.h"
#include "Kismet/BlueprintAsyncActionBase.h"
#include "UDemoAsyncNode.generated.h"

DECLARE_DYNAMIC_MULTICAST_DELEGATE_OneParam(FDemoOutputPin, float, DemoOutput);

UCLASS()
class ASYNCNODESUE_API UDemoAsyncNode : public UBlueprintAsyncActionBase
{
	GENERATED_BODY()

private:
	const UObject* WorldObject;

	FTimerDelegate TimerDel;
	FTimerHandle TimerHandle;

private:
	UFUNCTION()
	void InternalDirectCall();

	UFUNCTION()
	void InternalLaterCall(float timeElapsed);

public:
	float m_fDelayTime = 0.f;

	UPROPERTY(BlueprintAssignable)
	FDemoOutputPin Direct;

	UPROPERTY(BlueprintAssignable)
	FDemoOutputPin Later;

public:
	UFUNCTION(BlueprintCallable, meta = (BlueprintInternalUseOnly = "true", WorldContext = "WorldObject"), Category = "Demo")
	static UDemoAsyncNode* DemoBlueprintNode(const UObject* WorldObject);

	virtual void Activate() override;
};
The node function
The purpose of the node function (DemoBlueprintNode) is to create the actual node object that is going to be used in the blueprint graph. It will return a newly created node for Unreal Engine to use and it does not contain the logic that you want to run everytime the node is called since this is only called on node creation. The function is looking like this:
1
2
3
4
5
6
7
8
9
10
11
12
13
14
15
//============================================================

UDemoAsyncNode* UDemoAsyncNode::DemoBlueprintNode(const UObject* WorldObject)
{
	UDemoAsyncNode* Node = NewObject<UDemoAsyncNode>(); // Create a new object of the class.
	if (Node) // Check if the object creation is successful.
	{
		// Initialize any variables of the created object.
		Node->WorldObject = WorldObject;
		Node->m_fDelayTime = 2.f;
	}
	return Node;
}

//============================================================
We will create the node object and if the creation is successful we will set a couple of variables on the node to their correct values.
The main logic function
The following function is where the main functionality of the node will be put it. For now we will directly call the InternalDirectCall function. After that we will create a timer that will call the InternalLaterCall function after x seconds.
1
2
3
4
5
6
7
8
9
10
11
12
13
14
//============================================================

void UDemoAsyncNode::Activate()
{
	InternalDirectCall();

	if (!WorldObject)
		return;

	TimerDel.BindUObject(this, &UDemoAsyncNode::InternalLaterCall, m_fDelayTime);
	WorldObject->GetWorld()->GetTimerManager().SetTimer(TimerHandle, TimerDel, m_fDelayTime, false);
}

//============================================================
The pin functions
The last two functions that we will create are probably the easiest. We just call BroadCast on the node pin variables that we have declared in the header file and that is it!
1
2
3
4
5
6
7
8
9
10
11
12
13
14
15
16
17
18
19
20
//============================================================

void UDemoAsyncNode::InternalDirectCall()
{
	Direct.Broadcast(0.f);
}

//============================================================

void UDemoAsyncNode::InternalLaterCall(float timeElapsed)
{
	Later.Broadcast(timeElapsed);

	// Clean up the timer logic.
	WorldObject->GetWorld()->GetTimerManager().ClearTimer(TimerHandle);
	TimerHandle.Invalidate();
	TimerDel.Unbind();
}

//============================================================
The complete CPP file
Here is the complete CPP file for the async node.
1
2
3
4
5
6
7
8
9
10
11
12
13
14
15
16
17
18
19
20
21
22
23
24
25
26
27
28
29
30
31
32
33
34
35
36
37
38
39
40
41
42
43
44
45
46
47
48
49
50
51
52
// Fill out your copyright notice in the Description page of Project Settings.


#include "UDemoAsyncNode.h"

//============================================================

UDemoAsyncNode* UDemoAsyncNode::DemoBlueprintNode(const UObject* WorldObject)
{
	UDemoAsyncNode* Node = NewObject<UDemoAsyncNode>(); // Create a new object of the class.
	if (Node) // Check if the object creation is successful.
	{
		// Initialize any variables of the created object.
		Node->WorldObject = WorldObject;
		Node->m_fDelayTime = 2.f;
	}
	return Node;
}

//============================================================

void UDemoAsyncNode::Activate()
{
	InternalDirectCall();

	if (!WorldObject)
		return;

	TimerDel.BindUObject(this, &UDemoAsyncNode::InternalLaterCall, m_fDelayTime);
	WorldObject->GetWorld()->GetTimerManager().SetTimer(TimerHandle, TimerDel, m_fDelayTime, false);
}

//============================================================

void UDemoAsyncNode::InternalDirectCall()
{
	Direct.Broadcast(0.f);
}

//============================================================

void UDemoAsyncNode::InternalLaterCall(float timeElapsed)
{
	Later.Broadcast(timeElapsed);

	// Clean up the timer logic.
	WorldObject->GetWorld()->GetTimerManager().ClearTimer(TimerHandle);
	TimerHandle.Invalidate();
	TimerDel.Unbind();
}

//============================================================
Usage
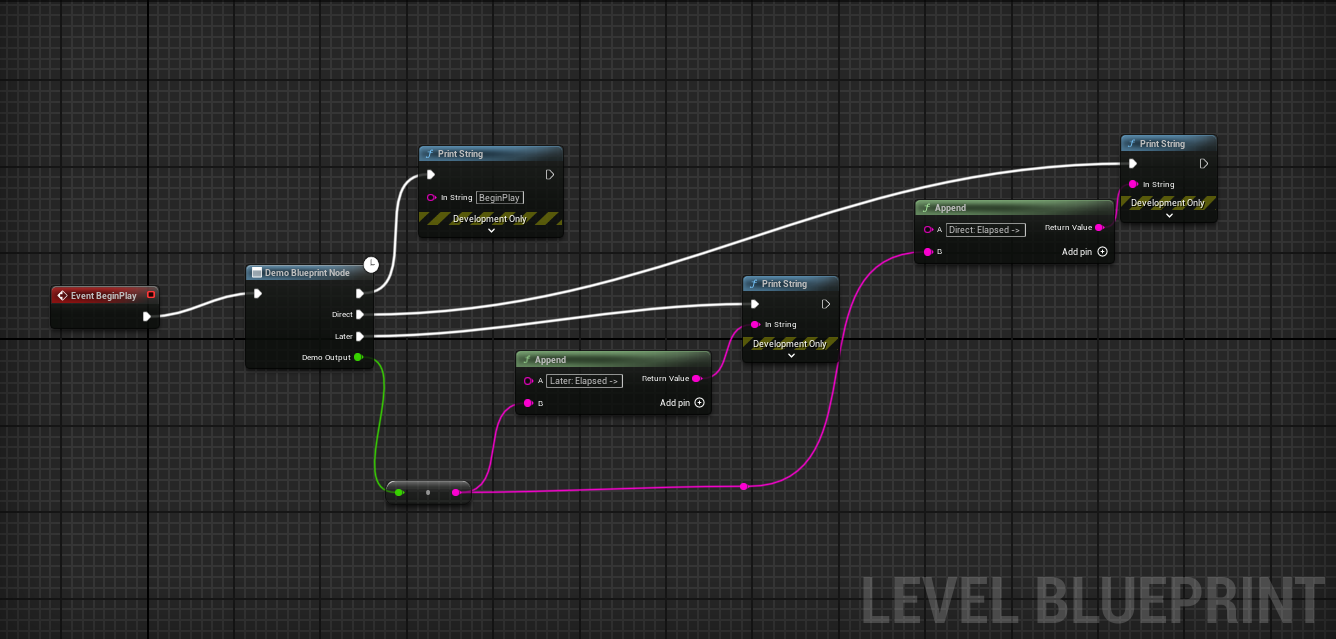
The only thing that has to be done to see it in action is to use it in the blueprints. You can use it in every blueprint you want!
Conclusion
Creating asynchronous blueprint nodes will be useful if you have functionality that will be called after some process is finished. For example, the online subsystem is finished with finding sessions that the player can join. If there are a lot of sessions to get it can take some time to collect them all and return them after the request. That is why Unreal Engine provides event delegates that you can use to bind functions to. Exposing all these events to blueprint nodes can clutter up the blueprints and make it less maintainable. So having one node with multiple output pins that you can bind the events to, makes it more maintainable.
The code for this demo is availabe on GitHub.

